




Screws Not Working Properly? Do These 3 Things First
Screws are simple fasteners, but small mistakes in screw selection or installation can create surprisingly frustrating problems. A screw may turn without tightening, back out repeatedly, snap during installation, damage the surrounding material, or become impossible to remove. Before forcing the screw farther into the material, stop and check the basic conditions first.
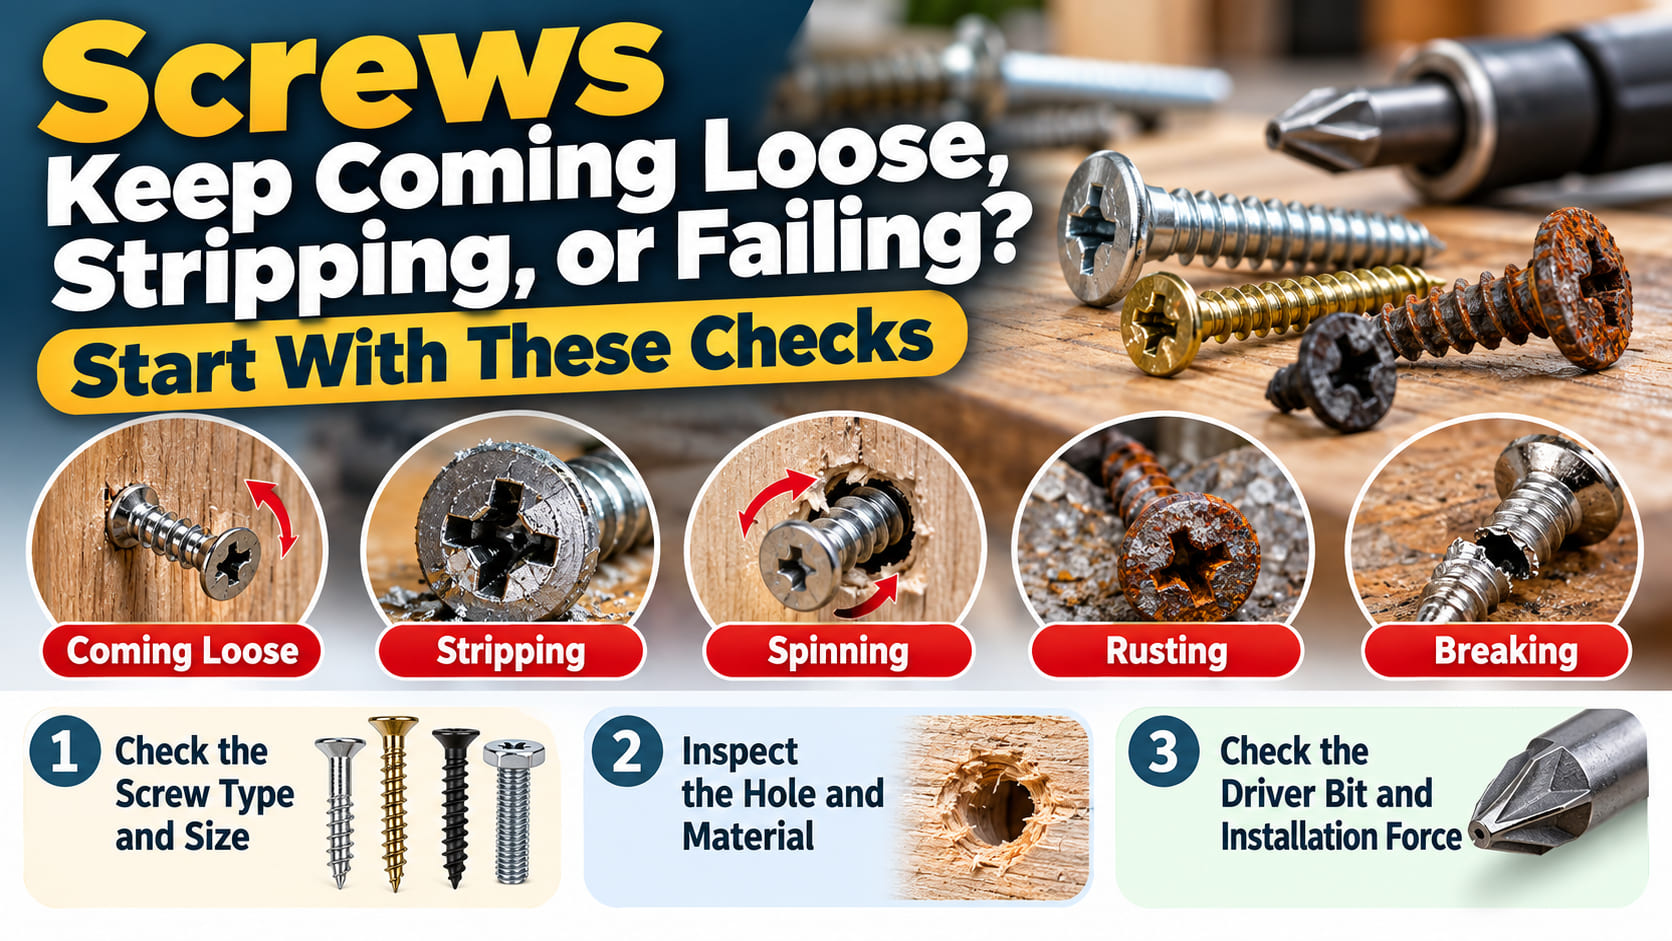
- Check the screw type and size. Confirm that the screw is designed for the material you are fastening and that its diameter and length are appropriate.
- Inspect the hole and surrounding material. Look for an enlarged hole, cracked wood, damaged threads, soft drywall, rust, or crumbling material.
- Check the driver bit and installation force. Make sure the bit fits the screw head correctly and avoid applying excessive torque.
If one of these three checks reveals an obvious mismatch, correcting it may solve the problem immediately. If the screw still fails to hold, continue with the troubleshooting process below rather than repeatedly driving the same screw into a damaged hole.
Common Screw Problems and Causes
Different screw failures point to different causes. The table below can help narrow down the problem before you attempt another repair.
| Cause | How to Identify It | Recommended Action |
|---|---|---|
| Wrong screw type | The screw does not bite into the material or loosens quickly. | Use screws designed for wood, metal, masonry, drywall, decking, or the specific application. |
| Hole is too large | The screw spins but never becomes tight. | Repair the hole or use an appropriate larger fastener or anchor. |
| Damaged threads | The screw turns unevenly or pulls out with little resistance. | Replace damaged screws and inspect the mating threads or material. |
| Over-tightening | The screw head strips, the screw snaps, or the material becomes crushed. | Reduce torque and stop tightening once the joint is secure. |
| Wrong driver bit | The bit slips or damages the screw head. | Match the driver profile and size to the screw head. |
| Vibration | Screws gradually loosen in machinery, furniture, fixtures, or equipment. | Inspect the joint design and use an appropriate locking method when specified. |
| Corrosion | Rust, discoloration, weakened heads, or seized threads are visible. | Replace with corrosion-resistant screws suitable for the environment. |
| Weak base material | Drywall, particleboard, old wood, or brittle material breaks around the screw. | Use the correct anchor or relocate the fastening point to stronger material. |
Check Whether You Are Using the Right Screws
One of the most common reasons screws fail is that the fastener does not match the material. Screws may look similar, but thread shape, point design, head style, material, coating, diameter, and length can all affect performance.
Wood Screws
Wood screws are designed to grip wood fibers. If a wood screw repeatedly loosens, the hole may have become enlarged or the surrounding wood may be damaged. Installing a thicker screw without checking the remaining wood can make the split worse, so inspect the area before changing sizes.
Machine Screws
Machine screws usually engage with a nut or threaded hole. If they will not tighten, either the screw threads or the mating threads may be damaged. Forcing a mismatched thread pitch can permanently damage both components.
Self-Tapping and Sheet-Metal Screws
These screws are commonly used with thinner metal and some plastics. If the hole becomes enlarged after repeated removal, the screw may no longer have enough material to grip. Repeatedly tightening harder generally makes the problem worse.
Drywall Screws and Anchors
Drywall is not strong enough to support many loads with a screw alone. If a screw pulls out of drywall, the correct solution may require an anchor or fastening into a wall stud. The load, wall construction, and hardware rating should all be considered before reinstalling the object.
Exterior and Corrosion-Resistant Screws
Outdoor screws must tolerate moisture, temperature changes, and sometimes chemicals or salt exposure. An ordinary indoor screw can corrode, stain the surrounding material, weaken, or seize. Select fasteners with a material or coating that is compatible with the environment and the materials being joined.
Step-by-Step Screw Troubleshooting Process
Step 1: Identify Exactly What the Screw Is Doing
Start by defining the symptom. Is the screw spinning freely? Is the head stripped? Does the screw tighten but loosen again later? Has the screw snapped? Is the surrounding material cracked? Different symptoms point to different failure mechanisms, so this first observation helps prevent unnecessary replacement.
Step 2: Remove the Load Before Working on the Fastener
If the screw is holding a shelf, bracket, panel, door, furniture component, or other object under load, support the object first. Do not rely on a partially failed screw while attempting a repair. If the application is structural, electrical, automotive, overhead, or otherwise safety-critical, professional inspection may be the safer next step.
Step 3: Inspect the Screw Head and Driver Fit
A driver bit that is too small, worn, angled, or the wrong profile can damage the screw head. Before applying more force, make sure the driver sits deeply and securely in the recess. Keep the driver aligned with the screw axis so the tool does not repeatedly slip out.
Step 4: Inspect the Hole
Remove the screw when practical and examine the hole. If the hole has become noticeably wider, cracked, stripped, or crumbly, installing another identical screw may not solve the problem. The repair method depends on whether the material is wood, metal, drywall, plastic, masonry, or a manufactured board such as MDF or particleboard.
Step 5: Verify Screw Diameter, Length, and Thread Type
A screw needs enough engagement to hold securely without damaging anything behind the fastening surface. A screw that is too short may not develop sufficient holding strength, while one that is too long can penetrate hidden wiring, plumbing, finished surfaces, or other components. Match the screw dimensions to the application rather than simply choosing the largest screw that fits.
Step 6: Check for Over-Tightening
More torque does not always create a stronger joint. Excessive tightening can strip wood fibers, damage metal threads, deform thin sheet material, crack plastic, crush drywall anchors, or snap the screw. Tighten only enough to secure the joint properly. For applications with specified torque values, follow the manufacturer's specification.
Step 7: Observe Whether Movement or Vibration Is Causing the Failure
A screw that is secure immediately after installation but repeatedly loosens later may be exposed to vibration, movement, thermal cycling, or repeated loading. Furniture joints, machinery covers, doors, appliances, and equipment can all experience movement. The correct solution may involve repairing the joint, replacing worn parts, or using a locking method specified for the application.
Step 8: Replace Damaged Hardware Instead of Reusing It
Screws with badly damaged heads, bent shanks, heavy rust, flattened threads, or obvious cracking should generally be replaced. Reusing damaged screws can make future removal more difficult and may reduce the reliability of the joint.
What to Do When Screws Keep Coming Loose
Repeatedly tightening loose screws without finding the underlying cause often provides only temporary relief. First determine whether the screw is actually backing out or whether the material around it has lost its ability to grip.
If the screw becomes tight again after a small turn but gradually loosens during use, movement or vibration may be the cause. If the screw turns continuously without becoming tight, the hole or mating threads are more likely damaged.
Important: Do not automatically apply thread-locking compounds, adhesives, or oversized hardware to every loose screw. The correct method depends on the fastener, material, required serviceability, load, temperature, and manufacturer instructions.
What to Do With Stripped or Spinning Screws
The phrase “stripped screw” can describe two different problems. The first is a damaged screw head, where the driver can no longer grip. The second is stripped threads or surrounding material, where the screw turns but does not tighten.
If the Screw Head Is Stripped
Stop using the same slipping bit. Continuing to drive the screw can remove even more material from the head recess. Check whether a fresh, correctly sized bit can still engage. Severely damaged fasteners may require a dedicated extraction method or professional removal, particularly when the screw is recessed, corroded, or located in expensive equipment.
If the Screw Spins Without Tightening
A spinning screw usually means the threads no longer have enough material to grip. The correct repair varies significantly by material. Wood may require a properly repaired hole, sheet metal may require a different fastener strategy, drywall may need an appropriate anchor, and machine-threaded components may require thread repair. Avoid repeatedly turning the screw because this can enlarge the damage.
When Should You Call a Professional?
Many ordinary screw problems can be diagnosed without specialized equipment, but some situations involve structural loads, electrical systems, moving machinery, expensive components, or hidden hazards. Stop and seek professional assistance when the consequences of a failed fastener could be significant.
- The screw is part of a structural connection, railing, ceiling-mounted object, or load-bearing assembly.
- The fastening point is near electrical wiring, plumbing, gas lines, or other concealed services.
- Multiple screws have failed in the same area.
- The surrounding material is cracked, rotten, heavily corroded, or otherwise deteriorated.
- A screw has broken below the surface and cannot be removed safely.
- Threads in an expensive machine, engine component, appliance, or precision assembly are damaged.
- The manufacturer specifies a particular torque, fastener grade, or installation method that you cannot verify.
- The screw continues to loosen after the obvious causes have been corrected.
In these situations, professional inspection can help determine whether the problem is limited to the screws or whether the joint, base material, equipment, or supporting structure also needs repair.
How to Prevent Screw Problems Before They Start
The easiest screw problem to fix is the one that never develops. Good screw installation begins with matching the fastener to the material and the operating environment.
- Choose the correct screw type. Do not assume that every screw can be used interchangeably.
- Use the correct diameter and length. The screw needs adequate engagement without being unnecessarily large.
- Use the correct pilot hole when required. A hole that is too large reduces grip, while one that is too small can split material or overload the screw.
- Match the driver bit exactly. Poor fit is a major cause of damaged screw heads.
- Keep the driver straight. Driving at an angle increases the chance of slipping and damaging the fastener.
- Avoid excessive torque. Tightening beyond what the joint requires can strip threads and weaken the connection.
- Choose corrosion-resistant screws where necessary. Outdoor, coastal, wet, and chemically exposed environments require suitable materials or coatings.
- Inspect high-use joints periodically. Doors, furniture, equipment covers, handles, and moving assemblies may loosen over time.
- Follow manufacturer instructions for critical applications. Fastener grade, torque, washers, anchors, and locking methods may all be specified.
Need help choosing or repairing screws?
If the correct screw type, thread, size, material, or repair method is unclear, consult a qualified fastener supplier, technician, contractor, or repair professional. Providing the material type, screw dimensions, application, environment, and photos of the damaged area can make diagnosis much faster.
Screws FAQ
Q1: Why does a screw keep spinning without getting tight?
A screw that spins without tightening usually means the hole is enlarged, the surrounding material has lost its grip, or the mating threads are damaged. Stop tightening and inspect the hole before installing another screw.
Q2: Why do screws keep coming loose?
Screws can loosen because of vibration, movement, temperature changes, damaged threads, weak base material, insufficient engagement, or an unsuitable fastener. The cause should be identified before simply tightening the screw again.
Q3: How do I know which screws to use?
Start with the material being fastened, the required load, the thickness of the materials, the environment, and whether the screw will engage wood, metal, masonry, drywall, plastic, or a threaded component. These factors determine the appropriate screw type, size, and material.
Q4: Can I use a larger screw in a stripped hole?
Sometimes a different fastener may be appropriate, but simply installing a larger screw is not always the correct repair. The surrounding material, available clearance, required strength, and reason the original hole failed should be checked first.
Q5: Why do screw heads strip?
Screw heads commonly strip because of the wrong driver bit, a worn bit, poor alignment, excessive torque, low-quality or damaged screws, or resistance that is too high for the fastener.
Q6: Should screws be tightened as much as possible?
No. Excessive torque can strip threads, damage the base material, deform components, or break the screw. Screws should be tightened enough to secure the joint, and specified torque values should be followed when provided.
Q7: Why do screws rust outdoors?
Moisture, salt, chemicals, and incompatible materials can accelerate corrosion. Outdoor applications should use screws with suitable corrosion resistance for the specific environment and materials being joined.
Q8: Why does a screw break while I am installing it?
A screw may break because of excessive torque, an undersized pilot hole, material that is too hard, corrosion, a defective fastener, incorrect installation, or a screw that is not suitable for the application.
Q9: Can I reuse old screws?
Reusable condition depends on the application and the condition of the fastener. Screws with damaged heads, flattened threads, bending, heavy corrosion, cracking, or other visible defects should not be reused.
Q10: When should a screw problem be handled by a professional?
Professional assistance is recommended when screws are part of structural, overhead, electrical, mechanical, automotive, or other safety-critical assemblies, when surrounding material is severely damaged, or when repeated fastener failure suggests a larger underlying problem.
 抽水肥怎麼找?從服務流程、費用因素到抽水肥廠商挑選一次看懂